
Export Multiple Pages and Files

You can export multiple pages from a single PSD with Export Kit Pro. You can output unlimited PSD to HTML webpages to create your full websites. Our Page Tags will allow you to customize content for a particular page by assigning a tag to a folder.
Each Photoshop layer in that folder will then be converted to an individual HTML page based on the PSD folder. This makes it easy to personalize your design to create a full PSD to HTML website.
Using Multiple PSD Files
Read our guide for Using Multiple PSD files with One Project, if you have many PSDs that you plan to convert for a single project.
Step-By-Step Video
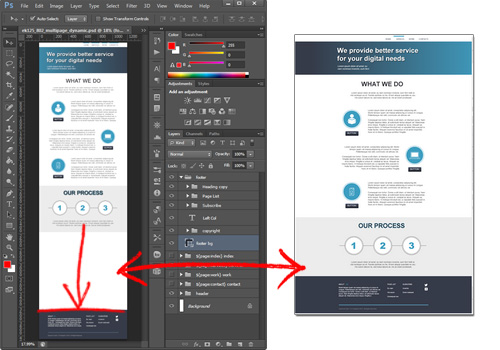
Need a visual? Watch our step-by-step tutorial!
Step 1: Page Tag Syntax
${page:[PAGE_NAME]} - FOLDERS ONLYWhere to use Page Tags
Use Page Tags with your Photoshop FOLDERS only.
${page:[YOUR_PAGE_NAME]}, all folder contents will render only on that page.This will allow you to create multiple pages with individual content for each page, along with content shared by all pages – eg. a header and footer, or nav menu.
Example:${page:index}
Example:${page:contact}
DO NOT Add Extensions To Pages
DO NOT add file extensions to Page Tags:
Eg: ${page:contact} - CORRECTEg: ${page:contact.html} - INVALIDExport Kit will add the correct file extension depending on the environment.
Step 2: Index Page
If you are using Page Tags then it is assumed you have multiple pages, so you MUST have {$page:index} and at least one other page.
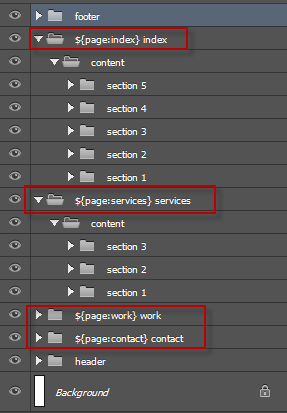
index page!Design And Layout Of Folders

You will need to organize your main design into a minimum of 3 folders (see image above). The concept of these folders is to have (1) elements that are on ALL pages, and (2) elements that are on individual pages.
${page:index} to your main [content] folder.Single Page Concept
CONTENT of the page.All pages will share similar content, eg. [header] and [footer], but your tags will control individual content; eg. [index], [about_us] and [contact].

A typical page or screen view will contain a [header], [content] and [footer]. The [header] and the [footer] content are meant to be the same (to an extent, you can customize individual page headers and footers if you like), while the “page content” changes depending on the page.
Step 3: Page Setup
Before creating pages, first think about the content you want to include in each page. Each Page Tag folder will render as an individual page containing both (1) the contents NOT included in pages, and (2) the content ONLY included in the current page.
Layout Of Multiple Page Folders
Assuming you want to create 3 web pages, you will only need Page Tags for the content of the pages – not the header and footer.
Multiple Pages Concept

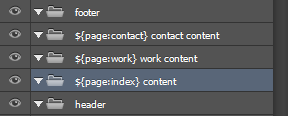
In most designs the [header] and [footer] portions of the website are reused on each page – although you have the option of creating a custom header or footer for each page.
Dynamic Pages Concept
You can add Page Tags anywhere in your PSD document, eg. [header] or [footer] to have custom content rendered on that page.

Assuming you want the [footer] of your “contact” page to have a [contact form], you can add a Page Tag within the [footer] folder and customize the [footer] for the “contact” page only.

The custom [footer] for "contact" page could now contain:
(1) a Google Map
(2) a newsletter signup
(3) a different background
etc...
DO NOT NEST PAGES
DO NOT add pages inside pages, this is illogical. What you are thinking of is an iFrame or Loader within a page – coming soon!
Step 4: Add Page Elements
Add the desired page design elements in each Page Tag folder, and you content will export on that page only. If you want content to render on all pages, then you should move the layer outside of the Page Tag folder.
OPTIONAL: Working With Dynamic Height
Once you have an idea of the page contents, we recommend you wrap the page contents in a folder
Eg. Wrap the page contents with a [Content] folder, then add the individual page layers inside.
This will allow you to accommodate for using Dynamic Height with your outputs. Dynamic Height will allow you to create individual page designs which have different content heights. Export Kit will measure the height of the contents in each page and place items accordingly.
OPTIONAL: Working With Link Tags
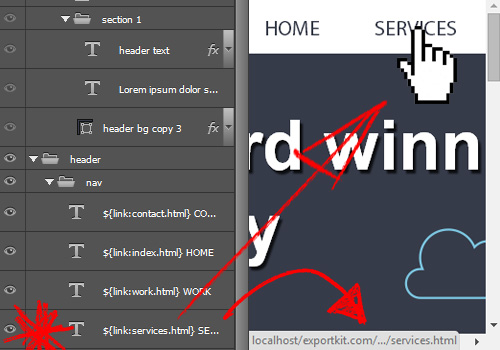
After you’ve created you pages, its likely you will require a menu to navigate to them. You can use Link Tags to link a layer to any page.
Eg. Assume you have a HTML5 output, and a Page Tag for a services page:${page:services}. You can then create a link to that page with a Link Tag:${link:services.html}, or${link:services/}if using PHP.
