
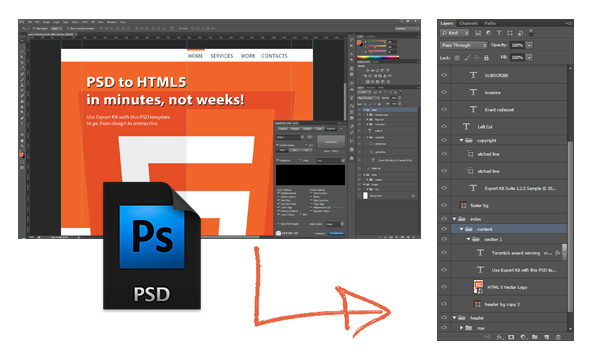
Convert a PSD To HTML5

Convert a PSD to HTML5 in a few clicks. Export Kit makes PSD to HTML5 and CSS websites quick, easy and painless from any Photoshop PSD to provide advanced HTML and CSS features. In minutes you can have clean and valid PSD to HTML5 conversion from Photoshop using Export Kit.
By hand, the PSD to HTML5 export process can take a couple days for a simple design, and up to several months for a complex PSD to HTML5 design – who wants to work that hard, when you can work smart with Export Kit!
PSD to HTML5 exports have full CSS support for with layer effects with both text and shape elements. You can directly convert your Photoshop PSD to HTML and CSS using Export Kit in a few minutes. Advanced users can also add JavaScript and PHP support directly inside Photoshop using our Layer Tags.
Try our new comprehensive PSD to HTML5 Manual - View Now
Full Video Tutorial – PSD to HTML (11 Videos)
*New UPDATED videos*
This guide will instruct you on going from a basic PSD to HTML5 and CSS3 export, to a fully responsive HTML website with 2 target screens and dynamic page height.
Step 1: Your PSD Design
Considering you want to convert your PSD to HTML5 we can assume you have your Photoshop design handy. Normally the task of converting a PSD to HTML5 can be a difficult one, requiring a basic level of knowledge for clean and valid code. Export Kit takes the headache out of the export process and will save you lots of time and budget with your web projects.
IMPORTANT: Use RGB color settings, this is the default for most environments - learn more.Test As You Go
It is important to test your design as you go – do not make changes to the entire PSD – then export and wonder “what went wrong”. This is no different than a developer who codes an entire website (without testing and compiling), then opens the browser and wonders… “What went wrong?”
IMPORTANT: YOU MUST TEST, TEST, TEST!WYSIWYG – What You See Is What You Get
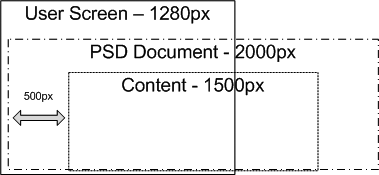
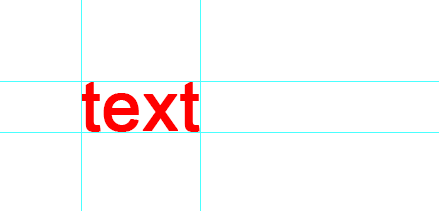
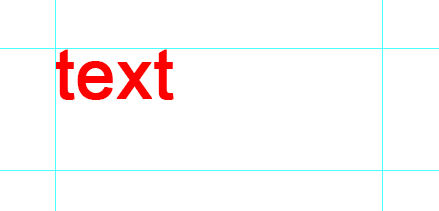
What You See Is What You Get, literally! If you zoom in to 100%, what you see in your PSD – is what you will see in the output.
EXAMPLE: If your Document width is 2400px - your Output width will be 2400px.
EXAMPLE: If your PSD design has the content margin at 500px - your Output content will start at 500px.
TIP: Trim extra white space in your PSD to avoid visual errors - learn more.
You should always build your default export first (what you expect to see), then customize your PSD with Output Options and Layer Tags.
Using Free Online PSD Templates

With Export Kit you can use any Free PSD Template you find online to generate your HTML5 and CSS3 website. Free online PSD templates will require some changes to ensure a correct HTML5 web export that visually maintains its consistency with Photoshop.
Free is Not Always Easy
Be aware that many Free PSD Templates are DESIGNS ONLY, and are not structured or organized for web exports. It is impossible to tell how another Designer may design their layout but there are some common things you can do to ensure the PSD is usable.
- Get the Output working first if you find Warnings and Errors
- Remove empty folders and empty layers
- Do not get
complexwith a free PSD until you have it visually stable Group similar contentand reorganize them as required- Re-draw bad text layers with the type tool, do not duplicate the text
Changes are Expected
Free online PSD templates will require some changes to ensure a correct PSD to HTML5 web export, that visually maintains its consistency with Photoshop. You will likely also want to include Layer Tags to make your PSD design responsive, add multiple pages and more.
Use Smart Objects Often
Use Smart Objects a lot, if you find an area in the PSD template causes errors, convert the element or the parent folder to a Smart Object – avoid the headache. Once your element is a Smart Object, you can reference the contents later in your export using Smart Object Tag.
Importing Illustrator .AI And Objects
You can easily cut-and-paste any Illustrator object into Photoshop and it will convert into a smart-object. Smart-objects will then render in the output as Smart Ojbect Images.
Illustrator AI Document
If you convert your .AI document to a .PSD using a script, it is likely that your document will have a lot of layers named Clip, Group or Path. These are common Illustrator layers which you will need to convert to ensure you document renders as expected.
NOTE: Once you convert these layers to a respected smart object, image or folder - your export will render 100% as expected.
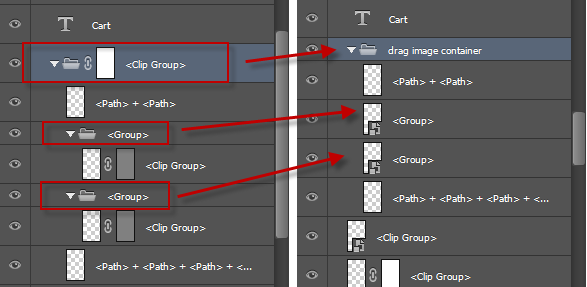
TIP: You can (a) remove the link mask of elements, or (b) create a new folder and drag the contents of the Group to the new folder - then delete the old Group.
Step 2: Working With Layers
HTML5 goes hand-in-hand with CSS3 allowing for full Layer Support with web shapes and text in your Output. With web-based content, you may not always want to use an image for a background with a solid color; as this will cause unnecessary longer page-load times. You may not require a text image, considering new web-based font support for CSS3.
View the Element Cheat Sheet to preview our HTML5 support
Export Kit has full support for images, text, shapes, folders and layer effects in Photoshop without Layer Tags. All functionality is built-in to Export Kit so… just be the creative you! All layers and effects supported work in most common environments.
Layer Output Order
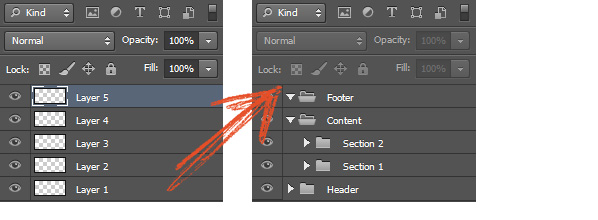
The Layer Process (part of the export process) for Export Kit is a Bottom-Up process. This means Export Kit works how you would naturally create designs in Photoshop wihtout changing your design style.
NOTE: Each layer is processed starting from the last or bottom layer (typically the "Background" layer), then up.
When new layers or folders are added in Photoshop, the newly created element will be nested on-top of the currently selected layer. So if you were to create a website template, you would start with the Header, then Content, then Footer. You can naturally design and Export Kit will handle the rest.
Websites with a Fixed/Static Height
Changing your layer order will not affect your visual output when Dynamic Height is not enabled.
Websites with a Dynamic Height
Incorrect layer order will affect your visual output when Dynamic Height is enabled. This will stack your content similar to table rows, you will need to have the correct content folders in the correct order – or you will have display errors.
Use Clear Layer Names
Your layer names will be reflective in your Output. Because Export Kit will render WYSIWYG, you will need clear layer names to further customize your HTML or CSS after the export. The export process will convert layers regardless of their names, but having clear layer names will optimize the time it takes you to find your layer in your code.
Use Common Names For Elements
We recommend using common names for elements to both keep consistency with coding practices, and to make it easier on yourself to find elements in the code output.
IMPORTANT: When elements are clearly labeled, you can easily add scripts to manipulate objects in the output.
Use Valid Layer Names

You should always use valid and common layer names with your content to ensure readable output. When you use incorrect layer names, most environments will throw errors as not all naming conventions are valid.
Use Unique Layer Names

All code environments require elements with unique names for correct rendering. Export Kit will do its best to add a unique identifier to each element (if the element name was previously used), but this is not 100% guaranteed.
Export Kit will always try to convert each layer name to a unique name, but there are situations where layers with the SAME name can cause display errors in the output.
No Empty Layers
You cannot have empty layers in Export Kit, otherwise the export will stop on that layer.
- A layer with no name
- A layer with no image/shape
- A text layer with no text
- A folder with no child layers
You will need to (1) remove the layer from your PSD or (2) add content to the layer.
Organize Folders and Layers

You Photoshop folder and layer structure is key to all designs as different environments have different requirements. There are situations where incorrect folders or layers can cause unwanted display errors in the output. Organized designs also provide organized output, which is what your client wants!
IMPORTANT: We encourage you to use as many layers and folders to design your PSD as possible. The more layers the better! You should always group your layers into folders if they are related.
Content Blocks
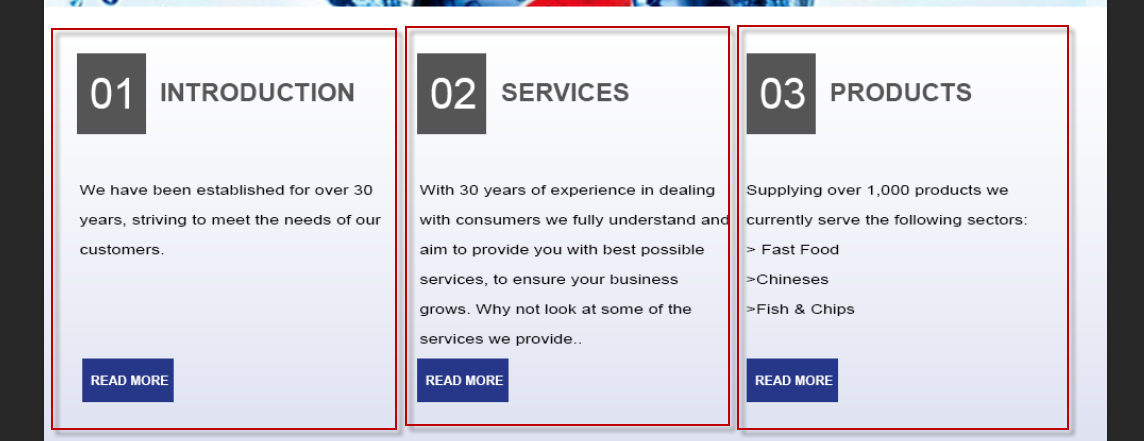
You should always organize your content in individual containers/groups. If you cluster elements into a single folder, that is how you output will render.
Inner Content
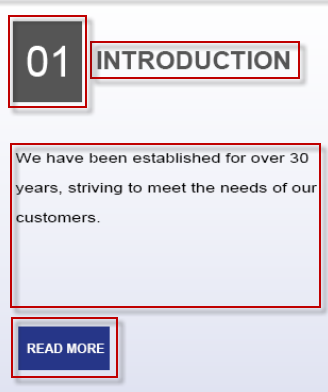
Once your group your containers, go further by organizing your inner content into additional groups. This will result in much cleaner code.
Step 3: Layer Type Support

HTML5 goes hand-in-hand with CSS3 allowing for full Layer Support with web shapes and text in your Output. With web-based content, you may not always want to use an image for a background with a solid color; as this will cause unnecessary longer page-load times.
You may not require a text image, considering new web-based font support for CSS3. These are examples where shapes and text will come in handy as it “draws” on the webpage rather than loading external content; such as a large image.
IMPORTANT: It is impossible to create a webpage without using both shapes and text in a modern website, on the other hand HTML5 CANNOT process shapes or styles without CSS or SVG.Image Support
All image layers are rasterized and rendered as shown in your PSD. In reality, an image is an image! You do not save much by applying a drop shadow to an image at runtime vs. loading a PNG.
Shape Support

Export Kit has great Shape Support with optional vectors also. There are no special settings required for processing shapes, simply use the shape tool and choose your shape, along with your desired shape options; Export Kit will do the rest.
IMPORTANT: Shapes save bandwidth! Images must always download to the client computer costing additional bandwidth. To reduce this, use shapes where possible - learn more.
TIP: All shapes are rectangles in code! It’s very common to mistake a shape’s visual design as its measured area, in all programming languages elements are treated as a rectangle area – learn more. Rectangle

- Fill Color
- Stroke Color
- Stroke Size
- Shape Size
Round Rectangle

- Fill Color
- Stroke Color
- Stroke Size
- Shape Size
- Corner Radius
Ellipse

- Fill Color
- Stroke Color
- Stroke Size
- Shape Size
SVG Support
** Lightning Storm v128 Only **
![]()
SVG and Vectors are used to render complex graphics which do not lose quality when scaled, this means that you can resize the graphic to any dimensions and it will always look pixel-perfect.
WARNING: For simple shapes vectors are ideal, but when using vectors for complex graphics - your Output file (eg. HTML file) can quickly increase in size = longer load time.Text Support
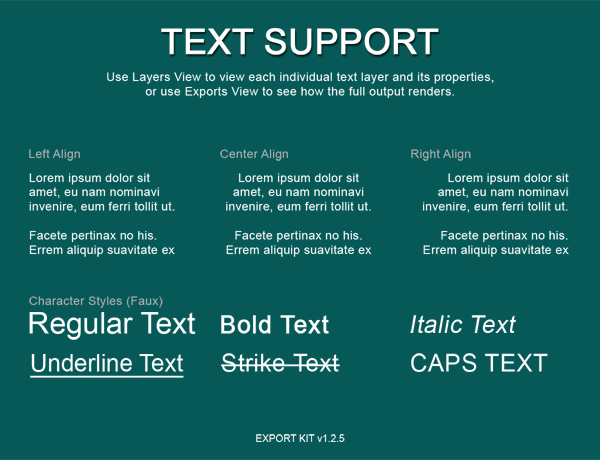
Export Kit has great Text Support for justification for left, center and right; including various character styles and paragraphs when using text layers.
NOTE: There are no special settings required for processing text, select the text tool, your font and settings; Export Kit will do the rest.
Label Text
This is the default rendering of text layers when using the type tool. Label Text will render the content of the text layer based on its calculated pixel size.
Paragraph Text
This is the secondary rendering of text layers when using the type tool. Paragraph Text will render the content of the text layer based on the size you draw the text layer.
Text Alignment

You can align/justify any text layer using the text align tool.
- Left
- Center
- Right
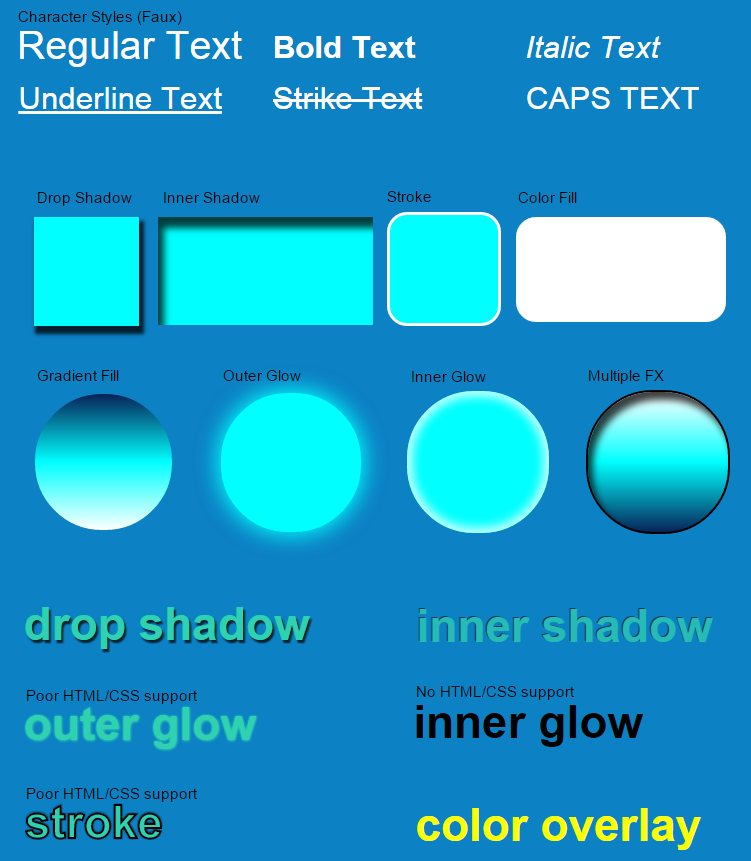
Character Styles
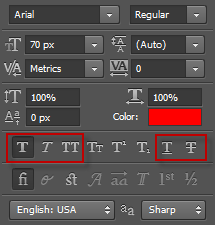
Character styles are supported in all environments by default without additional settings or external files.
- Regular
- Bold
- Italic
- Underline
Strike- UPPERCASE
Font Styles
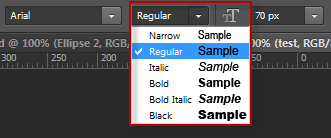
Font styles will often require additional settings or external files to correctly render.
Use Valid Characters

Not all environment support all characters. If you are using special characters in your output, it’s always safer to use the ASCII value.
Change your Text Layer Name
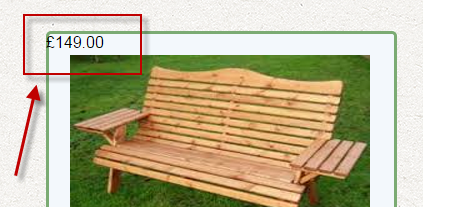
Photoshop will use the text contents of layers as the name. There are some cases where a designer may use a price, phone number or address – which can result in an invalid layer name.
IMPORTANT: No environment supports layers that start with numbers, and some characters are not valid as layer ids - learn more.
Do Not Scale Text
This is possibly the most common designer error. If you design changes and your text needs to become larger – do not scale the text, but rather change the font size.
EXAMPLE: A developer willNEVERcreate a text element with 16px font size, then scale the text via CSS to 187% - this isNOTindustry standards, you must change the font size!
Use Correct Text Settings

Always use round values. Consider that you may require a Developer to use the code after, a Developer will NEVER use a font size of 20.05px. Additionally only Adobe supports pixel-fractions.
IMPORTANT: You can design anything, but if you expectproduction-ready results- then you must create aproduction-ready design.
CSS Font Support
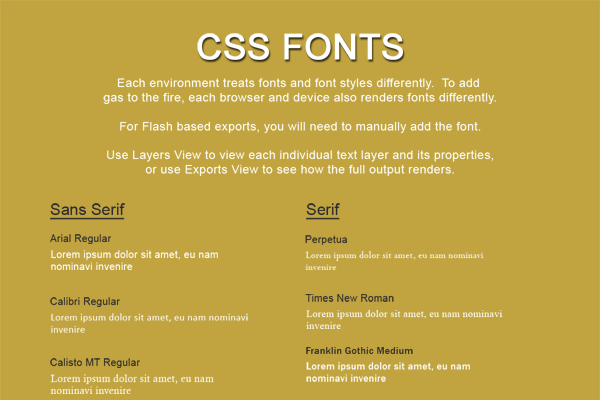
CSS Fonts are supported in Export Kit, but this will depend on the browsers you are viewing the HTML5 export in.
IMPORTANT: Each browser has individual CSS Font support so testing is required for the desired font and target browser.
Using Google Fonts
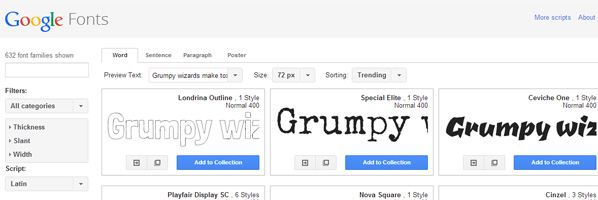
Export Kit makes it easy to add Google Font to your PSD design. You can use Google Fonts with any web-based export including HTML5, CSS3, JavaScript, jQuery and WordPress.
Google Font Autoloader Script v2
1 2 | <!-- Export Kit - Google Fonts Auto-loader v2 --> <script src="//exportkit.com/cdn/js/ek-googlefont-autoloader-v2-min.js"></script> |
Copy the code above and paste it in your Custom HEAD.
We have a custom JavaScript for adding Google Fonts to any project or website without additional dependencies. The script is open-source and free as air, so use it any way you feel. Once the script links are added, there are no other options to configure. Google fonts will now auto-load.
Step 4: Working With Layer Effects

Layer Effects will enhance your Output with additional rendering features for use with PSD to CSS3. You can add effects to any Photoshop layer element and Export Kit will render the effect directly in HTML5 and CSS3.
NOTE: HTML5 and CSS3 DOES NOT support all Photoshop layer effects.
IMPORTANT: Depending on your effect and the angle, your element size may change to reflect the effect applied to the element - learn more.
Drop and Inner Shadow
- Shadow Color
- Opacity
- Angle
- Distance
- Choke/Spread
- Size
Outer and Inner Glow
- Glow Color
- Opacity
Color Overlay
- Fill Color
- Opacity
Gradient Overlay
- Gradient Colors
- Opacity
- Angle
- Style
Stroke
- Stroke Color
- Size
- Opacity
Shape Effects
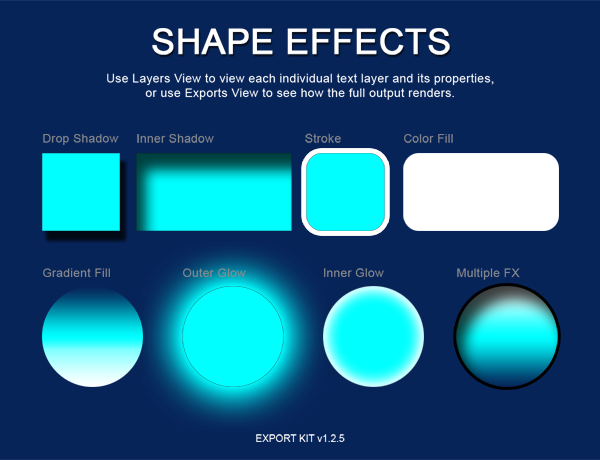
All layer effects are supported with shapes.
SVG Effects
All SVG effects are converted to Filters in the output when SVG Paths is enabled.
Text Effects

HTML5 and CSS3 have poor text effects support for glow, stroke, and gradient fill.
Image Effects
All image layers are rasterized.
Step 5: Using Layer Tags
Layer Tags Tags are custom names you can apply to elements in your document to convert them to respective objects in each environment. Layer Tags are very powerful and allow you to enhance your interactive output with common environment elements out-of-the-box.
Skip Tag
${skip} - ALL LAYERSThis tag can be used on both layers and folders to skip the element from processing during the export. This tag is great for keeping notes or custom elements within your document, used for reference rather than output.
Image Tag
${img}or${image}- LAYERS ONLY (NOT FOLDERS)
This tag will rasterize the contents of both layers and folders, converting the element to an image in the output. This will both save the image as the default image type and render the native environment image element.
NOTE: To render a folder as an image we recommend converting the folder to a Smart Object - learn more.
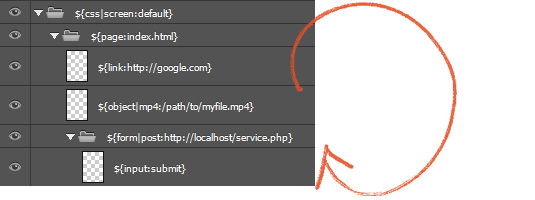
Link Tag
${link:[URL_ADDRESS]} - TEXT LAYERS ONLYThis tag will create a web link element, respective to the environment, to open a new browser page or tab – using the web address in the args. This tag is individually processed by each environment to open a web link only. The args must be a valid url, anchor or web script.
Paragraph Tag
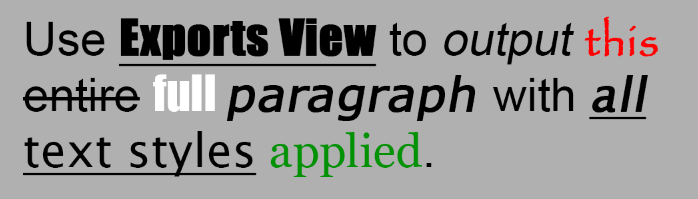
${p} - TEXT LAYERS ONLYWhen using this tag, all layer effects are rendered with each range of the text element as a span element in the output. The text ranges are converted to inline HTML styles and not in the CSS. Styles within a text block are just that – inline.
NOTE: Adding span styles to the CSS file is pointless, as you will likely use the style once.Object Tag
${object|[TYPE]:[URL_ADDRESS]} - SHAPE LAYERS ONLYThis tag will allow you to create media elements in the export. All supported object tags will use native HTML5 controls for rendering media. The args must be a valid url.
Object Types
- youtube
- wav
- mp4
- oog-video
- oog-audio
- webm
- swf
- wmv
Form Tag
${form|[TYPE]:[URL_ADDRESS]} - FOLDERS ONLYThis will allow you to wrap the document folder contents into a Form element respective of the output environment. The Form element will enhance your interactive outputs adding the ability to build data-driven interactive applications from a single PSD file.
Form Types
- get
- post
Input Tag
${input:[TYPE]} - TEXT LAYERS ONLY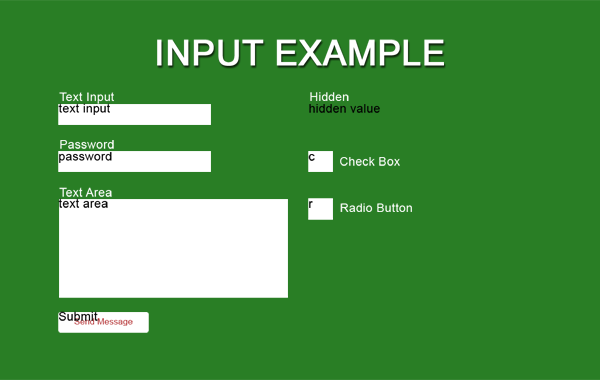
This will allow you to define many data elements and export them directly in your HTML5 webpage. The contents of the text layer will be used as the value of the input element when processing the form.
Input Types
- checkbox
- file
- hidden
- password
- radio
- reset
- text
- textarea
- submit
Layer Style Tag
${css|style:[name]} - ALL LAYERSThis tag adds custom CSS class styles to your PSD element. You can add any CSS class style, or customized PSD styles included in your ${css|styles} folder.
Class Styles Tag
${css|styles} - FOLDERS ONLYThis tag will group all your custom CSS classes created with your PSD elements. All child layers and folders are converted to CSS classes in the output using our Layer Naming Rules.
Code Tag
${code} - TEXT LAYERS ONLYThis tag will allow you to add raw code/script within the PSD Text Layer contents. You can draw any paragraph text layer in your PSD, but you should try to keep the size and position of your code layer relative to your design.
Class Tag
${class|[CLASS_NAME]:[PROPERTIES]} - FOLDERS ONLYThis tag allows you to add dynamic elements to your output. You can add any raw element, eg. H1 – along with properties. These elements will ONLY use the properties you assign in the Arguments.
Page Tag
${page:[PAGE_NAME]} - FOLDERS ONLY
This tag allows you to create additional pages from your document based on the output type. The Page tag will accept an args value which it will use to create the new page. Great for use with the Link tag to connect content!
NOTE: You can export unlimited pages, but multiple pages will increase the export time.
CSS Screen Tag
${css|screen:[SCREEN_SIZE]} - FOLDERS ONLY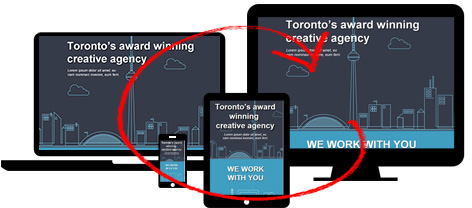
CSS Screen Tags give you the power to create responsive HTML5 and CSS3 websites from your PSD file. You can define multiple screen sizes to support any number of devices including desktop, tablet and mobile.
Common Screen Sizes
- ${css|screen:default} widescreen layout
- ${css|screen:1280} desktop layout
- ${css|screen:760} tablet layout
- ${css|screen:320px} mobile layout
NOTE: You can export unlimited screen sizes, but multiple screen sizes will increase the export time.
Tag Reference Table
| Tag | Example | Layer Support |
| Skip | ${skip} | All |
| Image | ${img} or ${image} | All |
| Link | ${link://google.com} | Layers |
| Language | ${char} | Text |
| Paragraph | ${p} | Paragraph Text |
| Media Object | ${object|mp4:/path/to/video.mp4} | Shape |
| Smart Object | ${obj} | Smart Object |
| Form | ${form|post://path/to/script.php} | Folder |
| Input | ${input:submit} or ${input:text} | Text |
| Layer Style | ${css|style:mystyle my_style2} | All |
| Class Style | ${css|styles} | Folder |
| Code | ${code} | Text |
| Class | ${class|div:role=”section”} | Folder |
| Page | ${page:index} | Folder |
| Screen | ${css|screen:default} | Folder |
Step 6: Before You Export
You're almost there - pixel perfect HTML5 - in a few minutes!
Make sure you read and understand our PSD Design Rules and Layer Naming Rules to avoid visual errors in your Output.
Make sure you read and go over our Before You Export Check List to avoid functional errors in your Output.
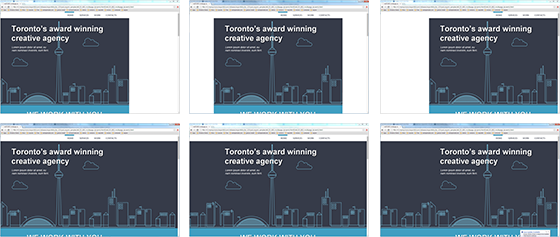
Photoshop vs. Image vs. Browser Rendering
All browsers and devices render fonts, sizes and effects differently!
DO NOTtry toFORCEan Output to work onALL browsers and devices- it'sIMPOSSIBLE, trust us - we test this all the time!
Align Your Look And Feel
You can use Align Output and Hide Overflow to customize your look and feel with Flush and Fluid layouts.
Fluid layouts.Optimize your CSS
Export Kit has a powerful CSS rendering engine which supports pseudo, selectors, skins and themes. You can control any CSS library and custom Photoshop styles to reuse images, create custom templates from a single PSD and add states to elements.
Export Kit allows you to create wireframe designs and the custom skins for elements which are generated in the output.
Packaging For Clients
If your PSD design is for a client, we have a few features which can make your client very happy with the project package you deliver. Export Kit can generate all the assets your client will need to feel empowered when using/modifying your Output files.
Use Image Kit Pro to save a Snapshot or Watermark of your work as-you-go, and Web Icons for your HTML pages.
Enable Keep PSD Assets to generate project related PSD templates. Each folder in your document will be saved as a [.psd] file for easy reference and modification.
RESPONSIVE DESIGNS ONLY - Enable Responsive Images to generate responsive image assets. Each image in your css screen folders will be saved as a new resized image.Export Kit Settings
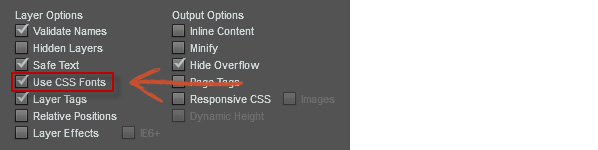
Export Kit allows you to customize your Output with Layer Options and Output Options before you export to personalize your project.
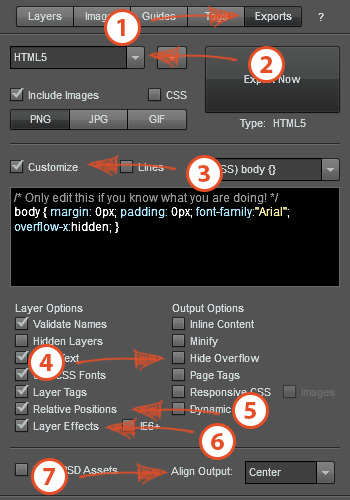
Settings used with this PSD Sample:
- Open Export Kit Suite, select ‘Exports’
- Click the dropdown, select ‘HTML5’
- Check ‘Customize’
- Uncheck ‘Hide Overflow’
- Check ‘Relative Positions’
- Check ‘Layer Effects’
- Click the ‘Align Output’ dropdown, select ‘Center’
Ready To Export
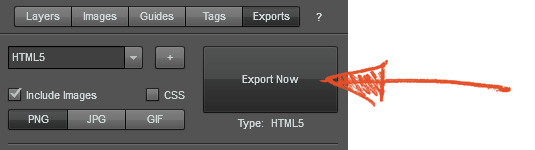
Once you have your settings ready, click Export Now – then watch the magic!
Step 7: PSD To HTML5
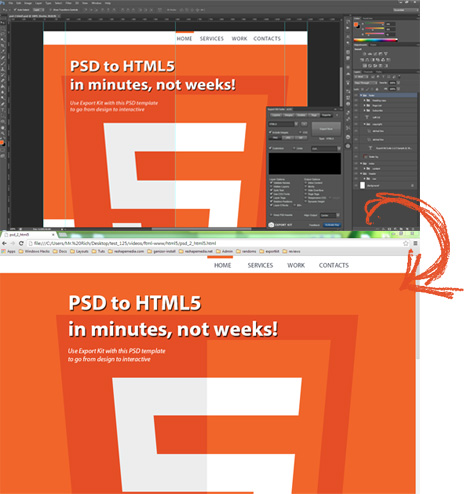
Presto, PSD to HTML5 and CSS3 in just a few clicks! Try it for your self!
Average Export Time
2 - 5 sec= Module (eg. Nav Menu)30 - 40 sec= Basic Webpage1 - 2 min= Complex Webpage6 - 8 min= One-pager Website6 - 8 min= 3 Responsive Screens8 - 10 min= 5 Page Website20 - 25 min= 5 Page Responsive Website (3 Screens)
If The Export Stops – You Stop!
Export Kit will cancel an Output if it finds an error in the Photoshop layer. If Export Kit cancels / stops the Output, what you should do is:
DO NOT save the document. At this point layers have been renamed!- Note the layer the Output canceled on
- This is the layer
causing the issue, read: No Empty Layers - This is only for you to
note the layer, anddebug the problem DO NOTsave the document,CLOSEthe document andREOPENit- Fix the problem,
SAVEand re-export it
Step 8: After You Export

All browsers and devices render content, objects and effects differently – this means you may have to tweak your output to meet your project requirements.
IE, Chrome, FireFox, Smartphones, Tablet, etc...It also helps to see how each device and browser processes HTML and how each renders it’s elements.
Try our HTML5 Cheat Sheet for a quick reference to many of the unique features Export Kit supports with PSD to HTML and CSS conversion.
Things We Found While Testing
- Export Kit is the ultimate PSD plugin… 😉
- IE has the best font rendering
- IE has the best form rendering
- Chrome has the best css font support
- IE has poor CSS3 support
- IE fonts are smaller than others
- Chorme font styles are wider than others
- FireFox character styles are wider than others
If you want to test supporting all browsers and devices – go figure, download our Photoshop vs. Environment Rendering free PSD templates. This will give you all tools required to test all devices and browsers.
Optimize Display Errors
Visual errors can be fixed by reading our Optimization Tips. We cover over 40 different user cases, so you may find a quick solution to your problem with our Tips.
Common Visual Errors
Bug: You export stops on a Shape Layer
RGB color mode when exportingBug: Your webpage has text and SOME images but not allftml-www” Output folder and run the export again.Bug: Your webpage has text and NO images at allLOWERCASE file extensions such as my_file.psd when you name your files“ “ (space) characters from your PSD nameBug: Your HTML5 element did not render 100% like the PSD layer
${img} to the layer name to render the layer as an image.Bug: You're stuck, and you have a question
You’re human, so are we!
Easy Fix Functional Errors
Almost all functional errors can be fixed by reading our Before You Export Check List.
Edit And Upload With Dreamweaver
Once your output is finalized you will most likely want to upload it now to your web host, this step-by-step video will show you how.
Step 9: We Call This “Cloud 9”
Sit back and relax, Export Kit just saved you weeks if not months of work – with little to no effort. Ask your self: “Self, how much is that worth?”
