Layer Naming Rules
These are the general Layer Naming rules to follow:
Rule 1: Use Clear Layer Names

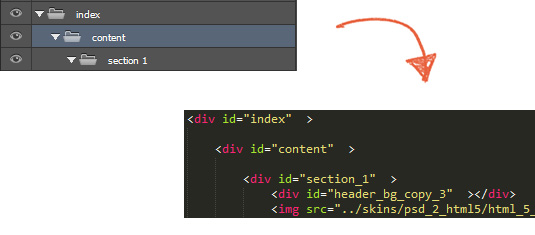
Your layer names will be reflective in your Output environment. Because Export Kit will render WYSIWYG (What You See Is What You Get), you will need clear layer names to further customize your Output after the export.
The export process will convert layers regardless of their names, but having clear layer names will optimize the time it takes you to find your layer in your Output after the export.
Use English Layer Names
There are a few key differences between HTML4 and HTML5 with IDs, which do not allow for backwards compatibility with Unicode Layer Names.
NOTE: The HTML 4.01 spec states that ID tokens must begin with a letter ([A-Za-z]) and may be followed by any number of letters, digits ([0-9]), hyphens (-), underscores (_), colons (:), and periods (.)... - learn more.
In Export Kit your Layer Name is converted to an element ID in your DOM. This makes it virtually impossible to have layer names with high ASCII values (aka most languages) that will work in older browsers. We plan to add support for Unicode Layer Names, but this will only work with HTML5 browsers.
Use Common Names For Elements
We recommend using common names for elements to both keep consistency with coding practises, and to make it easier on yourself to find elements in the code output.
- Header
- Content
- Section
- Menu
- Nav
- Button
- Footer
When elements are clearly labeled, you can easily add scripts to manipulate objects in the output. This allows you to create fully functional websites in a single export.
Add Tags Before Names
When using Layer Tags, we suggest you add the Layer Tag before the layer name to avoid confusion. You should always make your Layer Tags easy to read, adding the tag before the layer name makes this possible.
Eg. Assume we are adding a link tag, with the layer name “my contact link”:
${link:contact.html} my contact link - CORRECTmy contact link ${link:contact.html} - INCORRECTmy contact ${link:contact.html} link - INCORRECTAlthough all 3 examples above will work, you should add the Layer Tag before the name for easy viewing.
Rule 2: Use Unique Layer Names

All code environments require elements with unique names for correct rendering. Export Kit will do its best to add a unique identifier to each element (if the element name was previously used), but this is not 100% guaranteed.
You should always clearly name your layers with a unique name, this will help you to further customize your output after the export.
Layers With The Same Name
Export Kit will add a unique identifier to each layer name:
My Image = my_image
My Image copy 1 = my_image_copy_1
My Image = my_image_2
Export Kit convert all non-essential characters to underscore “_”, if you add non alpha-numeric characters often – you can break the automated unique layer naming.
(folder) My#Image = my_image
(layer) My@Image = my_image
In some environments this will still output correctly depending on the folder structure, but in many environments this will conflict with the CSS.
IMPORTANT: We strongly recommend you use unique names with your layers and folders.


