
Convert a PSD to Android XML UI and Java
Convert a PSD to Android XML UI and Java in minutes. Your PSD to Android XML conversion is quick and easy with Export Kit, supporting custom styles, target Android devices, Java code, and more. PSD to Android is an advanced export and will require a general understanding of Android and Java to modify the code.
Android XML UI, is very powerful and supports a variety of features and options. You can accomplish a lot with PSD to Android XML, but the magic of Android is in Java. Export Kit will provide you with all the required code files and assets to begin development of any Android app - in no time flat!
IMPORTANT: Android supports many screen sizes and devices, you will need to map your design to your target Android devices in Photoshop. (See Step 4 below)Before You Begin
Android XML UI and Java are advanced exports and will require customizations in the output to make the Android app functional. We recommend you use as many target screens as possible to target multiple Android devices, and Export Kit will handle all of your Android resources in the output.
IMPORTANT: You must use as many folders as possible to organize your UI/UX into stacked layouts. Your design should match the size of your target screen - learn more.RULE: Your design must start at 0,0.PSD to Android XML UI and Java
This guide will show your custom Android XML UI and Java from your PSD to Android XML export.
Step 1: Device UI Design
You can target an unlimited number of Android devices in your PSD design, but you should have one base design to first create your elements in. You can copy your design to various target screens after you approve your default device design.
Android uses density to map both the size and position of elements rather than pixels. This means that the visible size of the user’s device screen may not reflect the resolution density of the device.
EXAMPLE: A real life example of density is 2 phones with different screen sizes both sharing the same resolution.
IMPORTANT: (a) Android usesDPI(b) Photoshop uses a customAdobe Pixel- they areNOT THE SAME- learn more.
Element Rendering
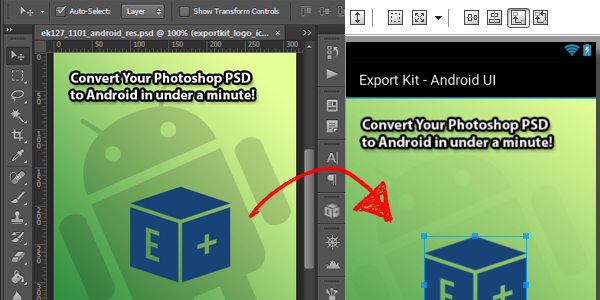
Export Kit will translate your PSD layers to Android XML elements with relative positioning to its respective parent element. Because you can target PSD to Android layout screens, your designs will render WYSIWYG (What you see is what you get), and will map to the target device screen. This will give you pixel-perfect translation of your PSD to android XML elements.
RULE: Android does not support (-) negative margins.NOTE: Your PSD to Android XML UI elements will userelative containerswithmarginsto measure the element's position and size.
NOTE: Photoshop and Android both render elements differently, and have different support for effects. Some Photoshop styles may not render the same visually in Android - we will fix this in future versions.
Color Rendering
All colors are stored as values is your Android resources folder. This makes it easy to manage your colors and styles from a single location.
Example Colors Values Resource
1 2 3 4 5 6 7 8 9 10 11 12 13 14 15 16 17 18 | <?xml version="1.0" encoding="utf-8"?> <resources> <!-- ek127_1101_android_res colors --> <color name="take_a_look_at_the_value_of_the_text_items_in__your__strings_xm_color">#000000</color> <color name="red_shadow_color">#FB0000</color> <color name="header_bg_copy_3_color">#657926</color> <color name="regular_text_color">#010101</color> <color name="rectangle_1_copy_2_color">#FF0000</color> <color name="rectangle_1_copy_4_color">#0042FF</color> <color name="drop_shadow_color">#2FD1B1</color> <color name="psd_to_android_ui_color">#FFFFFF</color> <color name="rectangle_1_copy_4_1_color">#6000FF</color> <color name="blue_box_color">#003366</color> <color name="rectangle_1_copy_4_2_color">#00FFAE</color> <color name="color_overlay_1_color">#FCFF00</color> <color name="rectangle_1_copy_3_color">#F6FF00</color> </resources> |
Image Rendering
Images are rasterized and rendered as-is. Your image will size according to the target screen, if no target screen is defined then the image is treated as a nodpi element.
Shape Rendering

Export Kit will convert Shape Elements from your PSD design directly into native Android shapes. There are no special settings required for processing shapes, simply use the shape tool and choose your shape, along with your desired shape options; Export Kit will do the rest.
Example Shape XML Resource
1 2 3 4 5 6 7 | <?xml version="1.0" encoding="utf-8"?> <!-- rectangle_1_copy_4_3 from your PSD file. --> <shape xmlns:android="//schemas.android.com/apk/res/android" android:shape="rectangle" > <stroke android:color="#000000" android:width="3dp" /> <solid android:color="@color/psd_to_android_ui_color" /> </shape> |
NOTE: All shapes are stored as nodpi resources, regardless of the target screen.Text Rendering

Export Kit has great Text Support for justification for left, center and right; including various character styles and paragraphs. There are no special settings required for processing text, select the text tool, your font and settings; Export Kit will do the rest.
Example String Values Resource
1 2 3 4 5 6 7 8 | <?xml version="1.0" encoding="utf-8"?> <resources> <!-- ek127_1102_android_screens strings --> <string name="app_name">Export Kit App</string> <string name="ek_img_content">PSD Image</string> <string name="psd_to_android_ui_string">PSD to Android UI</string> </resources> |
NOTE: All text content is stored as string values in the resources folder.Special Characters
Android treats Text very differently regardless of your character settings. Because the text is in the sting files, we recommend you use the ASCII value of your text.
You can google “ascii to Unicode converter“, or “ascii to utf8 converter” and you should find a few resources that can convert blocks of text. You can then use the converted text sting in your PSD design and you should be good-to-go!
String Resource Guide
Please read the Official Android String Resource Guide – you will find a lot of useful information regarding the CORRECT usage of strings. Some characters you need to escape, while others you may need to enclose in double quotes (“).
Escaping Strings
1 2 3 4 5 6 7 8 9 10 11 12 13 14 15 16 17 | This\'ll work -- OK "This'll also work" -- OK This doesn't work -- Causes a compile error This is a \"good string\". -- OK This is a "bad string". -- Quotes are stripped; displays as: This is a bad string. 'This is another "bad string".' -- Causes a compile error |
Font Rendering
You will have to manually import your required fonts into your Android project. In future versions we will import them from you.
Android Widgets
Export Kit makes it easy to create your Android widget layout in your design, then render the native Android widget in your project. Your widget will render with the size, position and effects applied to the layer. We recommend using Shapes to create widgets – when using other Layers, the properties of the layer are copied.
Step 2: Working With Layer Effects

You can convert your PSD layer styles to native Android XML styles directly with Export Kit. Your styles and effects will convert with all available options to render as a native Android effect.
Shape Effects Support
Text Effects Support
Custom Android Styles

Using our CSS Style and Styles tags you can create custom run-time styles for Android that will render with elements when compiled. This makes it easy to reuse styles and themes when creating your Android projects.
Step 3: Page Activities

You can create an unlimited number of Android Activities from your PSD design with Export Kit. Each activity will maintain a layout and Java file referencing each element in the layout.
RULE: Your project and page names must use [a-z0-9_.] - lowercase letters and numbers only.RULE: You must have content in your main Project Activity.
Android XML Activity

All elements in your Photoshop design are converted to super clean Android XML UI, with reference to all layer properties. Each Activity will create an individual layout XML file with all PSD layer elements within the respective ${page} folder.
Note: Some properties such as strings, images, and colors are linked to other resources files.
Note: If you have multiple target screens, then you will have one layout XML file per screen.Android Java Activity

All ${page} folders convert to respective Java Activities in the PSD to Android output. Your Java files will reference all the layer elements contained in the Android XML layout file.
Note: You will have one Java Activity per ${page} regardless of the target screens.Link Activities
Use our Link Tag to connect Activities and allow the end-user to navigate your Android app via native Intents. Links can be used with any PSD layer and will change the current Android Activity to the supplied link Activity.
Links are created in your Java Activity file and will simulate a “click” to navigate the user. In future updates we will add support for gestures and swipes.
NOTE: You do not need to add extensions to links, just use the page/activity name and Export Kit will reference the Activity.
EXAMPLE: If you have${page:user_home}then you can use${link:user_home}to connect the two.
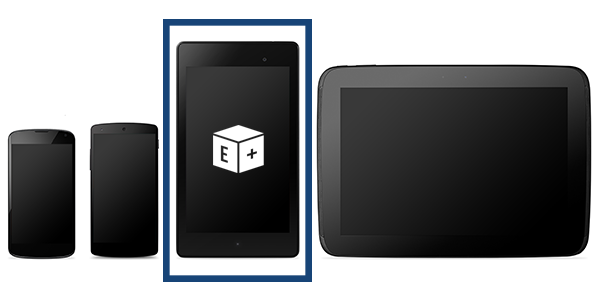
Step 4: Target Multiple Devices

Target unlimited PSD to Android devices from a single Photoshop file with our CSS Screen Tags. All layouts and assets are created by Export Kit from your PSD to Android XML output. Each target screen will generate an individual layout and drawable folder for the screen assets, but only one Java Activity is required per Android layout.
NOTE: Images will auto-resize to the correct layout and drawable size, but some images may require a re-export your images to match the correct dpi (if not already set in your PSD).
PSD to Android XML – Multiple Device Support
This guide will show your custom Android XML UI targeting multiple devices from your PSD to Android XML export.
Step 5: Before You Export
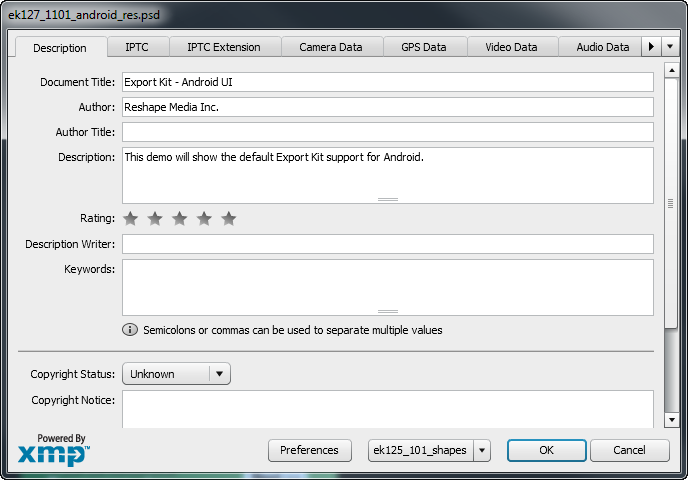
Your PSD document meta is used in your Android XML UI output to name your application. In future updates we will provide additional support for PSD file info.
NOTE: PressCtrl + Shift + Alt + ito access the Photoshop document meta, or go toFile > File Info.
NOTE: You're almost there - pixel perfect Android XML UI and Java - in minutes!
Avoid Output Errors
Make sure you read and understand our PSD Design Rules and Layer Naming Rules to avoid visual errors in your Output.
Make sure you read and go over our Before You Export Check List to avoid functional errors in your Output.
BUG: No resource found that matches... (at 'text'
FIX: Use the ASCII value for your string
BUG: Elements are positioned at 0,0 FIX: Android does not allow for negative (-) margins
BUG: Resource entry XXXXX is already defined
FIX: Use unique names with your layers
BUG: Invalid file name: must contain only [a-z0-9_.]
FIX: Use lowercase letters and numbers with your names
BUG: XXXX cannot be resolved or is not a field
FIX: Add your main Activity with ${page:index}
Export Kit Settings
Export Kit allows you to customize your Output with Layer Options and Output Options before you export to personalize your project.
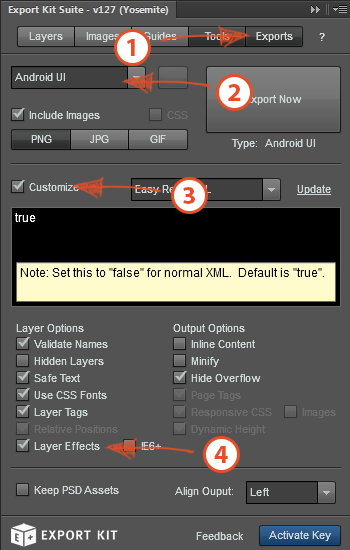
Settings used with this PSD Sample:
- Open Export Kit Suite, select ‘Exports’
- Click the dropdown, select ‘Android UI’
- Check ‘Customize’
- Check ‘Layer Effects’
Once you have your settings ready, click Export Now – then watch the magic!
ANDROID 4+: You can target any Android SDK version using your custom Android Output Content.
Average Export Times
4 - 6 min= Single Device App8 - 12 min= Normal App (4 devices)14 - 20 min= Multi-device App (8 devices)
If The Export Stops – You Stop!
Export Kit will cancel an Output if it finds an error in the Photoshop layer. If Export Kit cancels / stops the Output, what you should do is:
IMPORTANT: DO NOT save the document. At this point layers have been renamed!- Note the layer the Output canceled on
- This is the layer
causing the issue, read: No Empty Layers - This is only for you to
note the layer, anddebug the problem DO NOTsave the document,CLOSEthe document andREOPENit- Fix the problem,
SAVEand re-export it
Step 6: Import Your Android Project

Export Kit will provide you with a full Eclipse-ready Android project to import. You will need to have the required Android SDK to both modify and compile the output files.
Android Studio Import Steps:
- Copy the
folder locationof your output files - Open Android Studio, press
File > New > Import - Paste your
folder location, follow the steps to Import - Reload your errors, then press
Fix Graddle and Import SDKin your Messages
Eclipse Import Steps (Legacy):
- Copy the
folder locationof your output files - Open Eclipse, press
File > Import - Select
General > Existing Project into Workspace - Paste your
folder locationinto theSelect root directlyinput
JRE and “R not resolved” Errors (Eclipse Only)
There is a known bug with Eclipse where it will not render the JRE with a project correctly. The fastest workaround is to restart Eclipse, and your JRE will recompile with the projects.
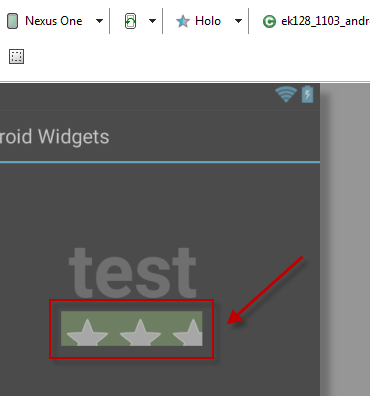
Preview with Graphical Layout

All PSD to Android XML UI outputs are rendered perfectly for preview in the Android Graphical Layout. You will see right-away that your PSD is converted to a pure Android XML UI with all your layer properties intact.
You can edit elements and properties using either the Android Graphical Layout, your layout XML, or Java Activity file. Each perspective will give you access to all elements in the respective layout.
IMPORTANT: We recommend you preview each target screen layout to ensure your PSD to Android XML UI output is as expected.
Tweak Your Images
Depending on your PSD image settings for dpi, you may want to re-export some images with the correct dpi settings respective of the target device.
Step 7: Test your Android App
At this point you PSD to Android XML UI is ready to compile and test. You will need to load an Android emulator for your test device, then build your project.
Step 8: Now Build Your Super App
Now you are ready to build your amazing Android app. All your resources, class elements and layouts are ready to go. That’s easily weeks to months worth of work, ask your self: “Self, how much is that worth?“
