
Update an existing Website or Blog

You can update any existing website or blog using Export Kit, with accurate conversion of your PSD design to match your custom project or framework. Learn the steps required to convert your PSD to your website or blog update. This works for any custom website, CMS (WordPress, Magneto, Blogger, etc.), or HTML based application.
This works with any custom Layer or Output settings applied.
Step-By-Step Video
Need a visual? Watch our step-by-step tutorial!
Take A Modular Approach
You may want to take a more modular approach to your concept and build smaller components – rather than the entire site. If you take each section of your design and export it individually, then you can easily add new components to any website or blog.
Export Kit Default CSS
Export Kit uses specific CSS content to allow your PSD design to convert pixel-perfect. In most situations, a current website will not use the same base CSS settings, and will likely have a custom CSS framework.
Example Export Kit Base CSS
1 2 3 | body { margin: 0px; padding: 0px; font-family:"Arial"; overflow-x:hidden; } img { position: absolute; display: block; margin: 0px; border: none; padding: 0px; } div { position: absolute; } |
Step 1: Remove The Tags
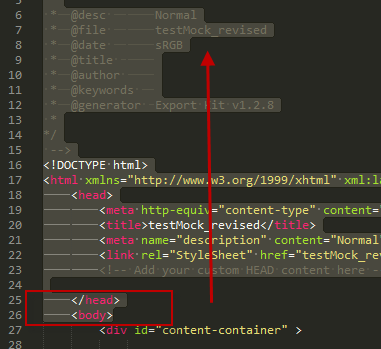
Remove the html, head, and body tags from your Output file. Export Kit will render your Output for drop-and-go usage. Due to the nature of PSD designs, our CSS content will need to change to accommodate other HTML environments.
This should leave you with only the #content-container div, you will use this to generate the elements for your website or blog update.
IMPORTANT: Don't forget to remove the closing html and body tags also (at the bottom of the file).Step 2: Change And Copy The CSS
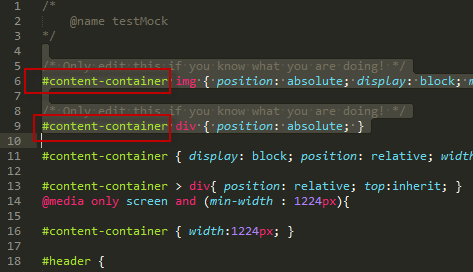
Change the CSS so the div{} and img{} tags are relative to #content-container, this will allow Export Kit content to render normally.
Eg. #content-container div { position: absolute; }IMPORTANT: Remove thebody tagin the CSS file similar to the image above. Thebody tagis not required for custom websites or blogs.
Step 3: Add The CSS Inline
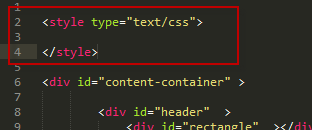
Copy and paste the CSS inside a style tag. This will give you all the markup required to update your content.
Final Image Check
Ensure you also have the correct image path on your server. Export Kit will output content RELATIVE to the files… in other websites and CMS blogs, you will likely have an images folder that is relative to your server-path, and not the current page.
You will need to change the image paths in the HTML file so they reflect your server/upload path.
Step 4: Copy and Paste
Copy and paste the contents of the file your created including the CSS style and the #content-container div tags. Then refresh your page and presto – that’s all you need to do!
