
How to optimize design with 4000+ layers?« Back to Questions List
I finally optimized the layers the way you showed me in the second video and it stopped working on the 2300 layers in the psd and 945 layers compiles.. after 2:35 hr... What do you recommend here..? I am not sure why so many layers when the content section only have 10 sections with around 13 layers each. header and foot are very simple Added August 25, 2016 6:17 am |
 This question has been resolved, view the correct answer now!
Hi, Correct this does apply to Responsive and WordPress, but the setup is a bit different. If you plan to use modular elements in a Responsive or WP export then we suggest you try one of our premium support packages so our Design team can help you with the initial setup: //exportkit.com/product_category/support. Answered On February 25, 2017 1:46 pm # |
You guys are the best, I now have a fun packed weekend. I am assuming I can apply this to wordpress and responsive exports? Answered On February 24, 2017 6:49 pm # |
| ✓ Correct Answer | |
|---|---|
Modular HTML TemplatesUsing this approach will give you a faster export, and allow you to modify sections of your design without conflicting with other creative. To continue from our previous post, here is a visual step-by-step guide. Please ensure you follow all steps to get an optimal output. The web team is creating a full tutorial for this shortly. Step 1 – Modulate your content
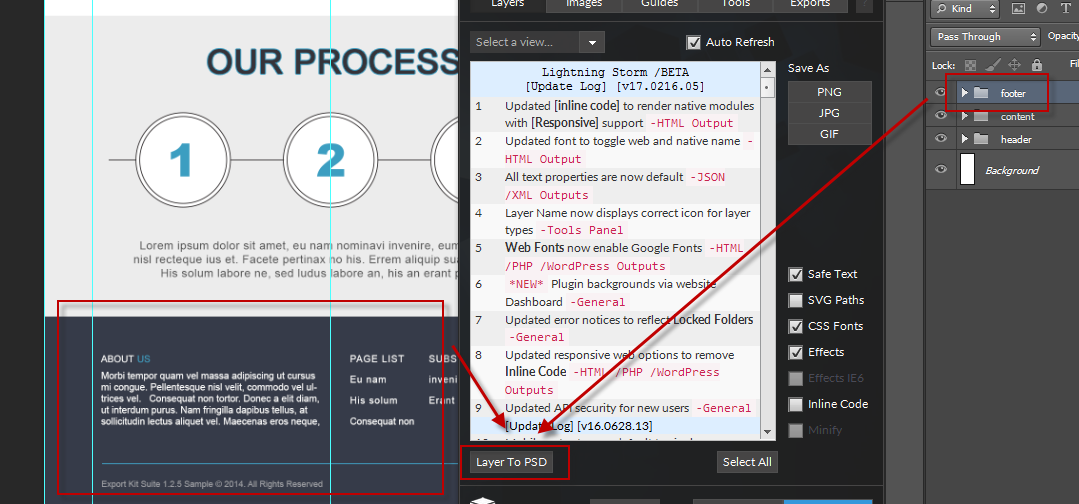
Use Layers Panel with Layer to PSD to create modular templates for your larger design. You can separate as many sections as you like to cut down the time required to build your project. *Repeat as required*Step 2 – Match the original template size
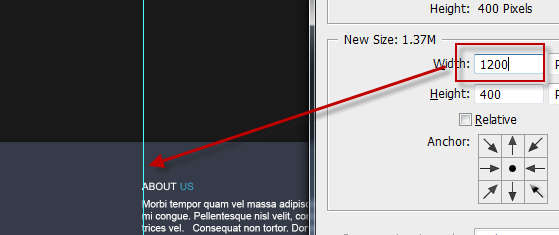
When you export a module with Layers Panel, it will match the size of the module content. With you design you want to ensure your module size is the same as your base template size, eg. 1200px. Save each module with the new size. *Repeat as required per module*Step 3 – Create the iframe linkage
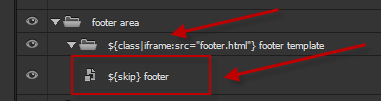
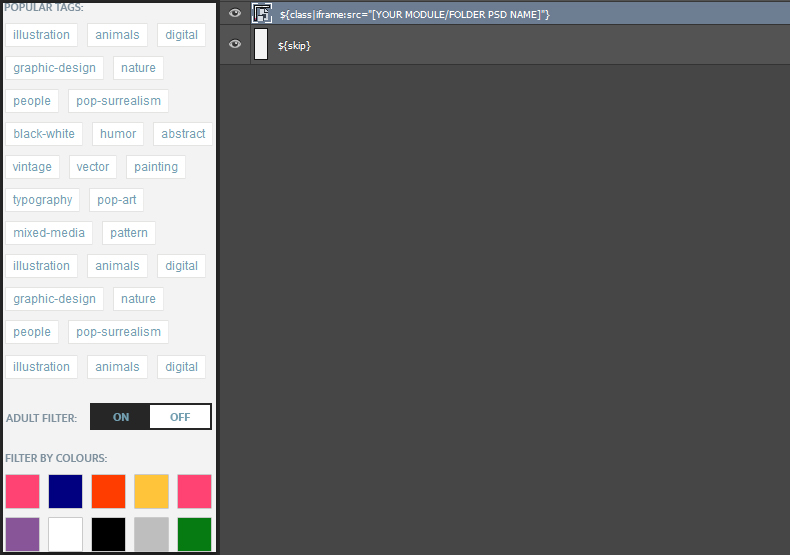
Return to your base template where you exported your modules in Step 1. Convert your module to a Smart Object / or rasterize the layer and add a ${skip} tag to that element. Once you have a Smart Object of your original content, you will need to wrap your content in a base folder, eg. footer area. Then wrap your Smart Object in a ${class} tag similar to the image above. ${class|iframe:src="footer.html"} footer templateYour class tag will act as a link to your footer PSD/html file. You will need to repeat this step for each module you create to add the correct linkage. Ensure the *Repeat as required per module*Step 4 - Add the iframe CSSiframe{
border:none;
width:inherit;
height:inherit;
}Add this CSS to your project using ${code} tag, or you can add it to your Custom Head. Step 5 – Export all files normally
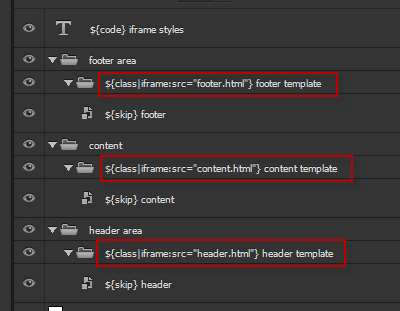
Your base template should now look similar to the image above with far less layers to deal with. The more modules you create, the faster you can get individual sections of your project exported. RECOMMENDED: Export normally without changing your custom options. OPTIONAL: Export with Inline Code enabled, then cut-and-paste the required sections. Answered On February 24, 2017 3:13 pm # |
Hi,We are creating a short tutorial for this to go into a bit more detail. Please bare with us. Answered On February 22, 2017 9:37 pm # |
Ok assumming I was starting with the side panel and following your suggestions I have 1: Used the Layers Panel to export this folder to an individual PSD file Now I am not sure what you mean ${class|iframe:src=”[YOUR MODULE/FOLDER PSD NAME]”} A: Do you mean I have to add just my folder name here… in this case its called ”side_panel_option”? or B: Do I have to add the full path to the file for example c:\folder directory\… 4: Do I then use exportkit this to export this file with [Inline Content] enabled
Answered On February 20, 2017 9:56 pm # |
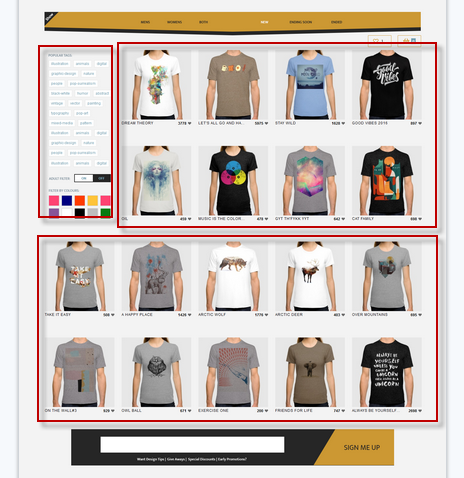
v17.0216.05 – Updated HTML RenderingThe new Lightning Storm version makes this process much easier. Along with the tips above what you can now do is modulate your HTML Output as a Template system. The trick is to plan ahead which parts you need to modulate and then use Layers and Exports panels to accomplish. Lets assume you sell t-shirts and have an item list to generate.
1. Use Layers Panel to export each module/folder to an individual PSD file (repeat for each required module). 2. Convert the module/folder into a Smart Object (for visual reference) and add a ${skip} tag to the element.3. Use ${class|iframe:src="[YOUR MODULE/FOLDER PSD NAME]"}, this will create a natural link to the module/folder – ensure you use the same name.4. Export this PSD and this will be your main template, after export you will not see your modules until they are created. But your template will have the containers required. 5. Save your module/folder PSDs that you created in step 1, export and ensure you have [Inline Content] enabled (repeat for each module/folder). 6. Open your original main template in step 4 and all your content will sync. This works because [Inline Content] with HTML now generates natural modules that you can plug in anywhere. Along with using iframes, you can easily create HTML templates that link together or you can always cut-and-paste the code after (if desired). Answered On February 20, 2017 3:11 pm # |
Smart Object Oriented Photoshop (SOOP)This is very important when using designs with many layers. This technique can dramatically speed up your export time 1000% when used correctly – not kidding. Answered On September 25, 2016 2:46 pm # |
Hi, This is a great question. Any design of that magnitude has the potential to split into several smaller modules belonging to the same parent project. Before you begin to optimize there are many features of Export Kit that you can take advantage of to optimize your larger projects. Split into multiple Designs//exportkit.com/learn/how-to/advanced-guide/using-multiple-psd-files-with-one-project This is key as it can become difficult to debug larger designs without reading all our guides in full. When you split your design you can ensure each section loads correctly then combine the output as required. Optimize your Design//exportkit.com/optimization-tips We have many tips and tricks to optimize your design for exports. There are many situations when designers will use multiple layers to create a single image, for an optimal export, this should be treated as an individual image. Our optimization tips will cover this situation and more. ${skip} errors for testingWith a design that large, expect to test, test, test. If you run into any issues with layers, you should ${skip} the layer for now until you have a working export. Additional info to come... Answered On August 31, 2016 1:06 am # |
 Looking for another answer? View other questions in or get premium support for guaranteed results.
Share Your Knowledge!
Contribute to the community and help other users to benefit from your answer with experience and knowledge.
