
PSD Design Rules
Considering you want to convert your PSD, we can assume you have your PSD design handy. Export Kit takes the headache out of the export process and will save you lots of time and budget with your web projects.
These are the general PSD Design Rules to follow, we also recommend you read: Getting the Output to look 100% like the PSD for pixel-perfect design tips.
IMPORTANT: test your design as you go – do not make changes to the entire PSD – then export and wonder "what went wrong". This is no different than a developer who codes an entire website (without testing and compiling), then opens the browser and wonders… "what went wrong". YOU MUST TEST, TEST, TEST!IMPORTANT: You must use RGB Color Mode with your design - learn more.Rule 1: No Empty Layers
You cannot have empty layers in Export Kit, otherwise the export will stop on that layer. Here is a list of empty layers:
- A layer with no name
- A layer with no image/shape
- A text layer with no text
- A folder with no child layers
Having any of these layers will cause Export Kit to cancel the export.
Rule 2: Use as many Layers as possible
We encourage you to use as many layers to design your PSD as possible. The more layers the better.
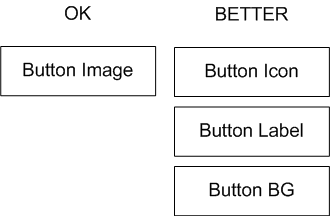
The Export Process will translate each individual layer to its native type, so the more layers you use – the more control you have over the output.
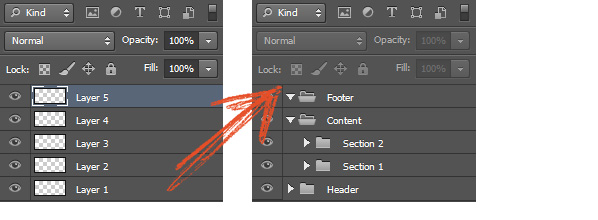
Rule 3: Organize Layers into Folders
You should always group your layers into folders if they are related – read more about Organizing Folders and Layers.
Eg. If you have layers that belong to a menu, then you should group those layers and name the group “menu container”.
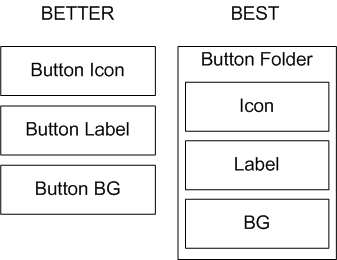
You can further organize your layers by grouping individual buttons into folders also: “home button”, “contact button”, etc.
Rule 4: WYSIWYG
What You See Is What You Get! If you zoom in to 100%, what you see in your PSD – is what you will see in the output. You should always build your default export first (what you expect to see), then customize your final output.
Read Getting the Output to look 100% like the PSD for additional tips.
Export Design
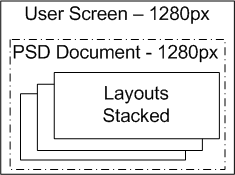
RECOMMENDED: Your design should fit the size of the user target screen, with additional layouts stacked on-top of another.
All designs in Export Kit should start at 0,0 will render similar to your design. Stacking content and using Layer Tags allows you to customize your output to match your project requirements.
Preview Print Design
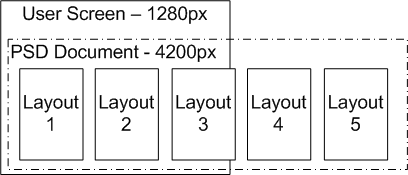
AVOID: If your design has all layouts side-by-side in a wide design format - your output will render all layouts using the size and margins from your design.The best way to approach this is to avoid it! When designing for print or client preview, it is very easy to create a side-by-side layout to preview all content at once – this is a preview print design, and will export as-is.
IMPORTANT: Yourpreview print designandexport designshould NOT look the same.
PSD Document Too Wide

AVOID: If your Document width is 2400px - your Output width will be 2400px.
Your document size should reflect the size you expect in your output. If you are creating a website and your target device is a desktop, then the size of your design should reflect your target screen.
NOTE: If you create a design with content that bleeds outside the user screen, then not all elements may be visible.
Content Margin Space
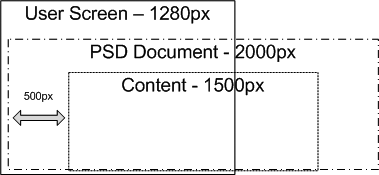
AVOID: If your PSD design has the content margin at 500px - your Output content will start at 500px.
Your content will render in the position you place it within your design. When you margin content in your design, the margin will also convert in the output.
NOTE: Avoid using wide margins in your design, eg. to center content - you can control this with Export Kit when you Customize your Alignment.
Rule 5: Layer Ordering is Important!
Export Kit is a Bottom-Up process. This means Export Kit works how you would naturally create designs in Photoshop wihtout changing your design style. Each layer is processed starting from the last or bottom layer (typically the “Background” layer), then up. Read more about Organizing Folders and Layers.
Changing your layer order willNOTaffect your visual output when Dynamic Height isNOTenabled.
Incorrect layer orderWILLaffect your visual output when Dynamic HeightISenabled.
Dynamic Layer Order
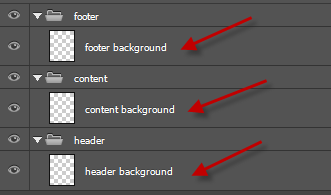
Because Dynamic Height will stack your content, you will need to have the correct content folders in the correct order – or you WILL have display errors.
If visually the element (folder) is above another layer (eg. header above content), then the header folder should be below the content folder in your PSD layers.
IMPORTANT: remember to use FOLDERS with Dynamic Height and not Layers to avoid display errors - read more.