
Custom WordPress Nav Menus
WordPress has great Navigation Menu support for pages, posts and custom links. WP Nav Menus are used in all theme designs and recommended as the content is controlled by the Admin, and not by the design.
Admins can customize which wp nav menu links are included, create multiple nav menus, and define the location of each wp nav menu in the WordPress Admin.
IMPORTANT: Each ${wp_nav_menu} defined in your design will convert to an individual WordPress menu location.Step 1: WP Nav Menu Design

Your wp_nav_menu is a virtual element and will render content from the database. Your design should reflect the area or bounds you want your menu to display within. Your nav menu and items can then customize further using CSS styles.
IMPORTANT: It is common to design your menu with additional items to visualize how many elements you want displayed. You must include these design elements in a ${skip} folder to prevent them from exporting with your theme. Define your nav menu area by adding a shape layer in the ${wp_nav_menu} folder's parent, and adding ${skip} to that shape so it is not rendered.
IMPORTANT: The ${skip} shape will define the area/bounds of the wp_nav_menu.${wp_nav_menu}
${wp_nav_menu|[DIRECTION]:[MENU_NAME]} - Folders onlyUSAGE: ${wp_nav_menu|h:Header Menu}This is a *SMART* tag and will use the layers within the PSD folder as objects in WordPress. This tag will generate a list of WordPress navigation items and a custom admin menu. The menu name you assign will generate in the Admin menu options.
NOTE: You can choose a horizontal menu with "h", or vertical with "v" in the direction.
Your menu area will allow for a maximum number of menu items to display. It is important to note to the WordPress Admin the max number of menu items in each ${wp_nav_menu} you define in your design.
Step 2: WP Nav Menu Items
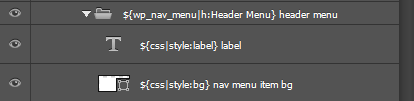
When you create navigation items for your menu, you only need to create a single object for the specific layers to control the label and background style of each element. All elements are dynamic and will populate using WordPress infromation from the database.
Use CSS Style Tags to control the navigation: (a)${css|style:label}- Text layer (b)${css|style:bg}- Shape layer
Nav Menu Styles
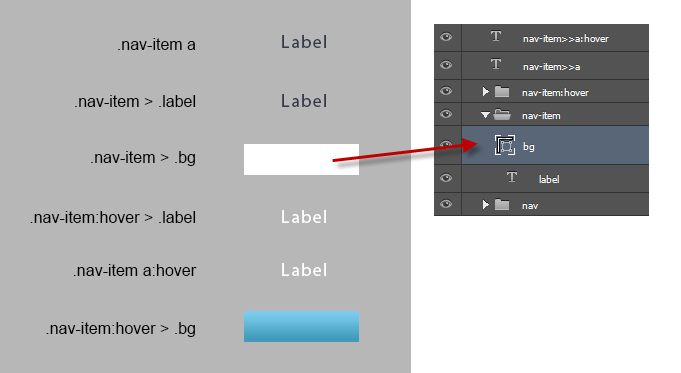
WordPress will reuse these styles when rendering each menu item in your menu. Using CSS Style Tags with the single menu item will give you visual control of all items in that menu.
Step 3: Label Content
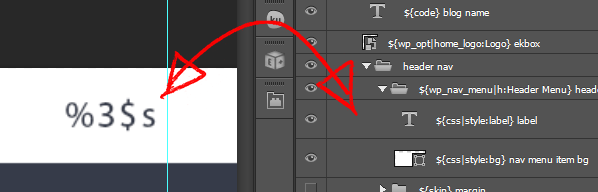
WordPress has specific rules when requesting menu items, and specific characters used to render item names: “%3$s“. These characters must be included in the label text content, otherwise the menu item name will not display.
IMPORTANT: You must include "%3$s" in the text content or the menu item labelwill notrender.
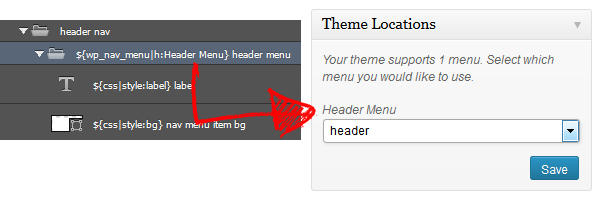
Step 4: Admin Menu Locations

Once your theme is activated, you will need to assign a menu to each location. In your WordPress Admin, navigate to Appearance > Menus > Manage Locations.
NOTE: A location is created for each ${wp_nav_menu} defined in your design. Multiple nav menus will result in multiple locations. NOTE: Use this feature to your advantage as most designs commonly have 2 menus at minimum, aheaderandfootermenu.
