
Building Web Forms

You can create unlimited web forms and input items with Export Kit, using only a few layer tags. Export Kit allows you to fully customize your web forms and data to create data-driven websites in a matter of minutes, without coding.
Step-By-Step Video
Need a visual? Watch our step-by-step tutorial!
Step 1: Create the Form Container

You will need a folder to contain the form and the input elements, much like a normal web form. We recommend you create a general container/folder, eg. form container.
NOTE: Use this folder as a container for all the form elements, including labels and design.
IMPORTANT: The nesting of the form and container do not matter.
Step 2: Create a Form

You will need to create a web form to process the input data. You can optionally create a POST or GET form, depending on your PHP form handling script.
EXAMPLE: ${form|post:email_form.php} my contact formStep 3: Add Input Elements
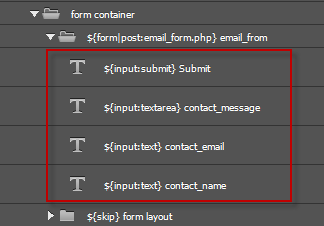
All web forms require Input elements to process data on the server. You can add unlimited input items to your webform using our Input Tag.
IMPORTANT: The contents of the text layer will be used as the value of the input element when processing the form.
TIP: Take care when adding layer names for Input items, the layer name will be used as the Input item name in the output. Learn more about Layer Naming Rules.
Input Type Support
Input Tags work with Form Tags to provide customization support for web forms. Input Tags will allow you to define many input elements and export them directly in your HTML5 webpage.
- checkbox
- file
- hidden
- password
- radio
- reset
- text
- textarea
- submit
Example:${input:submit} submit
Example:${input:text} user_name
Example:${input:password} user_password
Example:${input:hidden} submit_token
Creating Input Layouts

Because all browsers and devices render forms and input item differently, you will likely need to optimize the final output.
Input items in Export Kit are created with Paragraph Text. Because Input items are text layers, you will not have the same graphical options to display the item in your PSD – its a text layer, not an image.
You can create a general layout using the Skip Tag, and then create the input design within.

Eg. You want the PSD design to show the input area for “name”:
- Draw a shape of the input area
- Move that shape to the skip folder
- Add the Input Tag for “name”
Step 4: Server Side Form Handling
You will need to have an understanding of server-side scripts (eg. a PHP email script) to process the web form and data.
Example PHP Email Script
1 2 3 4 5 6 7 8 9 10 11 12 13 | <?php //edit this $youremail = "youremail@yoursite.com"; $subject="Message sent using your contact form"; //DO NOT edit this $name=$_REQUEST['name']; $email=$_REQUEST['email']; $message=$_REQUEST['message']; $from="From: $name<$email>\r\nReturn-path: $email"; mail($youremail, $subject, $message, $from); echo "Email sent!"; ?> |
Advanced users can further customize their email scripts directly inside the PSD. Read our online guide for Creating PHP Email Form Handlers to learn how to enhance your web form.
Working with Developers
If you are a designer and you work with developers, then you only need to ask:
“What variables and input types are you looking for?”.
${input:#INPUT_TYPE#} #VARIABLE#
${input:text} contact_name
Then you can add the Input Tags based on the input types, and the layer name based on the variable.
Step 5: Adding Styles to Input Elements

Advanced users can add custom CSS styles to control the look and feel of each Input element. Export Kit has advanced CSS features which allow you to target and customize HTML.
